Archive for April, 2010

Angie’s two cheese alfredo (with chicken and asparagus)

April 29, 2010

“If you want something to taste good, you have to use quality ingredients.” – (Grandma) Millie Cherryholmes (and virtually every chef/foodie/decent cook in the world)

This is never more true than when it comes to sauces… specifically an Alfredo sauce.  Personally, I’m not really a big fan of the cheese sauce + pasta combination — I much prefer a bolognese or simple Italian gravy — but as it’s Keith’s favorite… on occasion I cave.  In this instance, I’m glad I did.

I realize this is technically  probably not an Alfredo sauce… but let’s just be kind and say it is.  Normally with cheese sauces I stay very french and stick with Swiss and add a few spices.  Last night I needed something different (with allergies if the flavor doesn’t slap me in the face, I taste nothing… so clearly Swiss just wouldn’t cut it).

My new friend at the Amish Market on the corner (who we’ll call Angie) had a good 2 minute conversation with me in the cheese aisle about sauces – which is saying something of a total stranger in Manhattan – and agreed with me that if I was going to mix two flavors of soft cheese in a sauce, Swiss and Smoked Gouda would probably be a safe bet.  So here we go.

Ingredients: (serves 3-4)

  • 1 cup Swiss cheese (grated)
  • 1 cup Smoked Gouda (grated)
  • 2 chicken breasts
  • 1 lb Asparagus (chopped)
  • 3 tablespoons olive oil
  • 1/4 teaspoon rosemary
  • Garlic powder (to taste)
  • Sea Salt (to taste)
  • Black pepper (to taste)

What you’ll need to clean up:

  • 1 baking sheet
  • 1 cutting board
  • 1 cutting knife
  • 1 basting brush
  • 1 soup/stock pot
  • 1 sauce pan

Step One: Pre-heat oven to 350 degrees

Step Two: Fill a 3 quart (or more) soup or stock pot half full of water and bring to a boil, add salt and a dash of olive oil. Bring to a boil.

Step Three: While waiting for water to boil, brush both sides of chicken breasts with two (of the three) tablespoons of olive oil and sprinkle with rosemary, salt, pepper, and garlic powder.  Place on lightly greased baking sheet.  Toss chopped asparagus in remaining olive oil and place on same baking sheet.

Step Four: Roast chicken and asparagus in 350 degree oven for 20-22 minutes (until no pink is left in chicken).

Step Five: While chicken and asparagus are roasting, put pasta into boiling water until at desired consistency (8 minutes) and remove, drain and cover.

Step Six: While pasta is cooking, place sauce pot over medium heat and melt 2 tablespoons of butter.  Once butter is melted, add 1 tablespoon of flour and whisk until butter and flour clump together.  Add 1 cup of milk and bring to a simmer, stirring continuously until smooth.  Remove from heat and add both swiss and smoked gouda and sir with which until sauce is smooth (you can bring back over heat if cheese isn’t melting).

Step Seven: Pour 3/4 of sauce into prepared pasta and stir until fully mixed.

Step Eight: Remove baking sheet from oven and cut chicken breast (on cutting board) into strips.

Step Nine: Equally distribute pasta into bowls and top with chicken, roasted asparagus and a 1/4 of remaining sauce (if desired) for each portion.

-Eat Hearty!

Millie’s Ten-Minute Donuts

April 28, 2010

Watch out people, this is a Millie Original. In fact, the first time I actually had these little “gems” (get it “gem donuts”… eh.. EH) was on a ski trip with my parents, sister, and Grandma Millie.  It was Christmas morning and after opening stockings, Grandma starts whipping these up and informs me that she used to make them with my Mom all the time (imagine my outrage at having never before been treated to homemade donuts).

Since then, I have now trotted these out at a couple of brunch parties.  Donuts make a fantastic party: simply give everyone there own brown paper bag with a coating of their choosing (powdered sugar, cinnamon and sugar, etc.) and everyone can coat their own hot donuts.  Make sure to brew a big pot of coffee and prepare yourself for swiffering after 🙂

Ingredients:

  • Canned biscuits (one biscuit is one donut… I usually do at least 20… often 30 if we’re being honest)
  • Enough vegetable oil to float a biscuit in a stock or soup pot.
  • Cinnamon and Sugar for coating (can also use powdered sugar or make a glaze from powdered sugar and a little milk)

What you’ll have to clean up after:

  • Soup or stock pot
  • Fork or tongs (for turning)
  • Your counter, floor… maybe yourself?

Step one: Place oil in soup or stock pot and heat on medium-high heat.  Oil is ready when you place one of your donut holes (see below) in oil and it begins to bubble and fry while floating.

Step two: Remove biscuits from can and lay each out on flat surface.  Using a vanilla lid or other small circle, cut a hole in the center of each biscuit (keep the cut out piece for donut holes later 🙂 ).

Step three: When oil is ready, place prepared biscuit into hot oil and let float and fry until golden on one side (depends on heat of oil, but watch closely… can be as quick as 15-20 seconds), then flip (using tongs or fork).

Step four: When opposite side is golden remove from oil and place on paper towel to sit for a minute (if you can wait that long… I’ll often down one after 20-30 seconds).

Step five: After a minute, toss in preferred coating and serve.  These are BEST when hot. As they cool they become a little more “biscuit like”… still good, but nowhere near as good as when hot.

Repeat steps 3-5, until you’ve cooked all your donuts.  You can float as many in the oil as you can comfortable turn.  Be extremely careful when frying… it’s VERY hot.

Serve as you go along: drink a lot of coffee, have good conversations… and try not to think of the calories :-).

-Eat Hearty!

Easiest Roasted Chicken… EVER

April 27, 2010

I recently shared this trick with the ladies of Big Girl Small Kitchen and decided to trot it out again last night.  Roasting a chicken can seem like a daunting task, but in reality, the only tricky part is how to keep the moisture in.

I find the best way to keep a chicken nice and moist while roasting is to simply baste it with a comination of balsamic vinegar and honey.  I really don’t know the chemistry of it, but when you mix the two together, it completely dissolves into a single liquid that you can easily spread accross your chicken.

So simple. And I have yet to have my chicken come out dry.  I’ve only used this on chicken breasts (I rarely have the occasion to cook an entire chicken), but I’m sure it would work just as well on the whole thing.

Ingredients:

  • Equal parts Vinegar and Honey (depending on how much chicken you’re roasting)
  • Salt (to taste)
  • Pepper (to taste)
  • Rosemary (to taste)

What you’ll clean up afterwards:

  • One small mixing bowl
  • whisk (or fork)
  • basting brush

Step One: Pre-heat oven to 350 degrees.

Step Two: Whisk the vinegar and honey together in a small mixing bowl.  Add salt, pepper, and rosemary to taste.

Step Three: Lightly salt and pepper the chicken and rub in on both sides

Step Four: Baste all sides of the chicken with the vinegar/honey mixture.

Step Five: Grease a baking sheet (I use Pam-olive oil) and place breasts on it.

Step Six: Roast in 350 degree oven for 18-20 minutes or until there is no pink left in center of thickest part of the meat.

-Eat Hearty!

Red Velvet Brownie Cupcakes

April 26, 2010

There are two things in life that I know – without a doubt – will cure any case of the blues: brownies and cupcakes. Add in cream cheese frosting and you get downright euphoria.

“Why not combine the two” I asked myself… and so I did.  I remember both my Mom and Grandma used to make a variety of brownie bars that mixed cookie dough and brownie batter together (I believe) resulting in a chewy, buttery deliciousness.  Knowing it was possible, I started experimenting.

Combining some of my own ideas with various recipes from www.allrecipes.com, here’s what I ended up with.

The recipe below is the ridiculously simple method.  You can make both batters from scratch, but having done it both ways… there isn’t much of a taste difference, but purists are purists… so knock yourselves out.

Ingredients:

For Cupcakes:

  • 1 (19.5 oz) package brownie mix
  • 2 eggs
  • 1/2 cup canola oil
  • 1/4 cup water
  • 1 (18.25 oz) package white cake mix
  • 2 tablespoons canola oil
  • 1 1/3 cups water
  • 3 egg whites
  • 2 teaspoons dark chocolate extract (optional)

For Frosting:

  • 1 small box confectioners sugar
  • 1/2 cup butter (room temp)
  • 1 8oz block cream cheese (room temp)
  • 1 teaspoon vanilla
  • 1-2 teaspoons milk

What you’ll have to clean up:

  • 2 mixing bowls
  • 1 regular bowl (for egg whites)
  • 2 cookie scoops
  • 1 frosting knife
  • 1 mixing spoon

Step One: Preheat an oven to 350 degrees F (175 degrees C).

Step Two: Line 48 muffin cups with paper liners.

Step Three: Whisk together the brownie mix, 2 eggs, 1/2 cup canola oil, and 1/4 cup water in a bowl – just until fully incorporated, about 50 strokes do not overmix. Set aside.

Step Four: In regular bowl, beat 3 egg whites until frothy. Set aside.

Step Five: Mix the cake mix, 2 tablespoons canola oil, 1 1/3 cup water, and 2 teaspoons of dark chocolate extract (if available) in a large bowl with an electric mixer on low speed until combined.  Fold in 3 egg whites and mix on medium speed for 2 minutes.

Step Six: Using cookie scoop, fill each cupcake paper 1/3 full with brownie batter. Add cake batter over the brownie batter, until muffin cups are each 2/3 full.

Step Seven: Bake in the preheated oven until golden and the tops spring back when lightly pressed, about 20 minutes.

Step Eight: Make frosting: cut the block of cream cheese into smaller pieces (4-6) and place in mixing bowl.  Cut the butter into 1/8 cup pieces and add into bowl.  Cream the butter and cream cheese together — you can add a little milk to facilitate this process.  Add in the vanilla and 1-2 teaspoons of milk (you can add more if you like a less firm frosting).  Stir until fully incorporated.

Step Nine: Frost your cupcakes using either a knife or piping bag.

-Eat Hearty!

Asparagus and Cherry Tomato Pizza

April 22, 2010

MMMMmmmmm.  Thanks to Simple Bites for this delicious recipe, and a really compelling sell for CSA’s and picking your own produce.

I’d never heard of a “Meat CSA” until recently.  Highpoint Farms actually sells meat, cheese and egg shares.  Check it out.

Click on the image for the Asparagus and Cherry Tomato Pizza recipe.

-Eat Hearty!

Those Pesky Conversions…

April 21, 2010

I almost wept when I found this on Not Derby Pie (a really fun blog, check it out).  I can’t even count the number of times I’ve been scratching my head for more time than I care to admit over CONVERSIONS *mild hyperventilation*.

So here are all the conventional conversions you’ll ever need… plus a few you might have never known about.

  • 1 tablespoon (tbsp) = 3 teaspoons (tsp)
  • 1/16 cup (c) = 1 tablespoon
  • 1/8 cup = 2 tablespoons
  • 1/6 cup = 2 tablespoons + 2 teaspoons
  • 1/4 cup = 4 tablespoons
  • 1/3 cup = 5 tablespoons + 1 teaspoon
  • 3/8 cup = 6 tablespoons
  • 1/2 cup = 8 tablespoons
  • 2/3 cup = 10 tablespoons + 2 teaspoons
  • 3/4 cup = 12 tablespoons
  • 1 cup = 48 teaspoons
  • 1 cup= 16 tablespoons
  • 8 fluid ounces (fl oz) = 1 cup
  • 1 pint (pt) = 2 cups
  • 1 quart (qt) = 2 pints
  • 4 cups = 1 quart
  • 1 gallon (gal) = 4 quarts
  • 16 ounces (oz) = 1 pound (lb)
  • 1 milliliter (ml) = 1 cubic centimeter (cc)
  • 1 inch (in) = 2.54 centimeters (cm)

For: 1 Tbsp fresh herb
Use: 1/3 to 1/2 tsp dried herb (of the same kind)

For: 1 clove garlic
Use: 1/8 tsp garlic powder

For: 1 egg in baking
Use: 1 tsp cornstarch plus 1/4 cup water

For: 1 whole egg
Use: 2 egg yolks plus 1 Tbsp water

For: 1 cup buttermilk
Use: 1 cup plain yogurt, or 1 cup sour milk (4 tsp white vinegar or lemon juice plus milk to make 1 cup — let sit for five minutes before using)

For: 1 cup corn syrup
Use: 2/3 cup granulated sugar plus 1/3 cup water

For: 1 ounce semi-sweet chocolate
Use: 1 ounce unsweetened chocolate plus 4 tsp sugar

For: 1 cup cake flour, sifted
Use: 7/8 cup all purpose flour, sifted (1 cup minus 2 Tbsp)

For: 1 tsp baking powder
Use: 1/3 tsp baking soda plus 1/2 tsp cream of tartar

For: 1 Tbsp cornstarch for thickening
Use: 2 Tbsp flour

For: 2 Tbsp tapioca for thickening
Use: 3 Tbsp flour

-Eat Hearty!

Artichokes. Don’t Be Intimidated.

April 21, 2010

Ever wondered how on earth people prepare and stuff artichokes for dinner parties.  “How do they find time” “They are braver then I”… these are the things your tell yourself.

Get over your fear… artichokes won’t hurt you.

In fact they’re a delicious, simple, and elegant way to start a dinner party or enjoy an evening at home.

Here’s a helpful video.  Her stuffing is great, I also enjoy using breadcrumbs, feta, garlic, and sundried tomatoes.

-Eat Hearty!

Double Butter Chocolate Chip Cookies

April 20, 2010

Butter + Butter Flavored Crisco = the-best-cookies-you-will-ever-eat. Seriously.

My mother is actually a very gifted baker.  For several years before I started school, she ran a gift basket business that featured here home-baked delicacies.  In my opinion she and my grandma share the blame for my uncontrollable love of butter… fodder for my (fictional) therapist, I suppose.

By far the best recipe she developed during this time were her chocolate chip cookies.  They are chewy, but a little crisp,  and PACKED with chocolatey goodness.  As an added bonus they will stay moist for at least 4 days (probably longer, but they never last that long) and the dough freezes quiet well.

Enjoy!

Ingredients:

  • 2/3 cup butter flavor Crisco (at room temperature)
  • 2/3 cup butter (softened)
  • 2 eggs
  • 1 cup white sugar
  • 1 cup brown sugar
  • 2 tsp. vanilla
  • 3 cups flour
  • 1 tsp baking soda
  • 1 tsp salt
  • 1 bag semi sweet chocolate chips (can also mix 1/2 bag semi-sweet & 1/2 bag milk chocolate)

What you’ll need to clean up

  • Mixing bowl
  • Egg Beater (or mixer)
  • One mixing spoon
  • Two baking sheets

Step One: Preheat oven to 375 degrees.

Step Two: In a large mixing bowl, cream Crisco, butter, eggs, white sugar, brown sugar, vanilla.

Step Three: Gradually add flour, baking soda, salt.

Step Four: Mix in the chocolate chips

Step Five: Use a small – medium cookie scoop (2 tablespoon balls) and place rounded balls on cookie sheet.

Step Six: Bake 8-10 minutes (if air bake: 9:30 is perfect).  Remove when golden (and still a little ‘wet’ in the center).  Leave on baking sheet for 3-4 minutes before moving to a cooling rack.

*if over baked, put into an airtight container with a couple slices of apple for a couple of hours and they will be moist a delicious once again 🙂

Eat Hearty

Nothing “Springier” than Fruit Salad

April 15, 2010

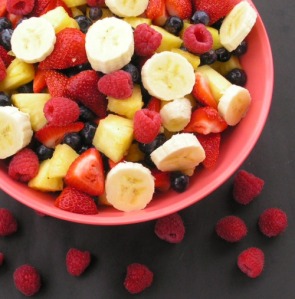
This last weekend on a work retreat I dusted off an old  Millie standby that I hadn’t had in years… Marinated Fruit Salad.

This really is one of the simplest dishes to make, but it’s dear to me for a couple of reasons.

  1. It reminds me of spring: this is one item you could GUARANTEE Grandma was going to make for the Easter picnic every year.  Bugs and the smell of dyed hard boiled eggs aside (we never “blew out” the egg shell in Kansas), that was really when we kicked off spring and welcomed the good weather.
  2. It reminds me of lunches with Millie: always a standby, the fruit salad came out as a part of a Saturday lunch with my sister and I.  The best part about a lunch at Grandma’s was that there was always baking afterward – tarts, pies, cakes, cookies… you name it, we baked it.  Always messy, but ALWAYS fun.

It’s funny the things that stick in your mind, but Millie’s fruit salad will forever remind me of picnics and making a mess in the kitchen… to date, two of my very favorite things :-).

Ingredients:

  • 2-3 Apples ( I prefer Granny Smith) – diced
  • 1 cup blueberries
  • 1 cup rasberries
  • Small carton strawberries – quartered
  • 3 bananas (sliced)
  • 2 cups grapes (either whole or cut in half lengthwise)
  • 1/2 cup orange juice
  • 1 tablespoon white sugar

What You’ll Clean up After:

  • 1 mixing bowl
  • 1 wooden spoon
  • measuring: cup and tablespoon

Step One: Combine all fruit into bowl.

Step Two: Add orange juice and sugar and stir, making sure all fruit get’s wet.

Step Three: Cover and refrigerate for 20 minutes, stirring every now and then to mix in the marinade.

Step Four: Serve with muffin, yogurt, or eggs for breakfast,  or as a lunch side.

-Eat Hearty

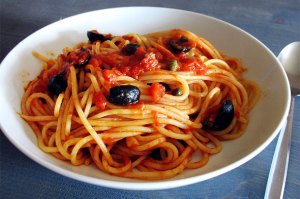
Mama Dawson’s Pasta Puttanesca

April 14, 2010

Thanks to my dear friend (Mama) Ted Dawson for this wonderfully simple and delicious Pasta Puttanesca recipe.

Ted and his partner Bart Boehler are a delightful couple I met at church and were so welcoming when I first moved here.  This was one of the first meals I made in my little broom closet of a Hell’s Kitchen apartment and it brings back fond memories.  Cheers Ted and Bart!

Ingredients:

  • 3 cloves garlic (minced)
  • 1 medium white onion (chopped finely)
  • 1 can anchovies rolled with capers
  • 2 cans tuna in olive oil (preferably Italian)
  • 2 cans crushed tomatoes
  • 1 can small black pitted olives (drained)
  • 1 tablespoon olive oil
  • Black Pepper (to taste)
  • Oregano (to taste)
  • Basil (to taste)

What will you have to clean afterward:

  • cutting board
  • chopping knife
  • stock pot (or large soup pot)
  • wooden spoon

Step One: Sautee the onion and garlic in olive oil for 1 minute

Step Two: Add anchovies (w/capers); break apart with spoon and continue to sautee with onion and garlic for another minute.

Step three: Add one can of tuna (and oil); break apart with spoon and continue to sautee until onions become translucent.

Step four: Add both cans of crushed tomatoes and bring to a simmer.  Add spices if desired.

Step five: Add remaining can of tuna (and oil) and olives (drained).  Continue to stir and bring to simmer.

Step six: Simmer for 20-30 minutes and serve with pasta.  Cheese optional, wine essential.

-Eat Hearty!