Archive for the ‘Uncategorized’ Category

What the heck is Oleo?!

June 25, 2010

I recently was loaned a cookbook by a friend.  This is no ordinary cookbook. The Ladies Aide Society Cookbook from the Central Schwenkfelder Church (Pennsylvania).

Now let me tell you, these recipes are amazing.  You’ll be seeing quite a few of them on this blog from time to time.  But there has been one overarching challenge to using these recipes – one that I often have with some of my grandma’s recipesIngredients that don’t exist anymore.

One ingredient, in particular: OLEO. I have asked myself on more than one occasion lately “what the hell is oleo”… the answer – I learned – is simple.  Margarine.

Simple, right?  Here I was convinced it was some mythical “crisco-esque” substance that would make all my cakes perfect, my muffins moist, and my brownies delectable.  All that is true, but there’s no magic to it… just plain old margarine.  The reason many grandma’s refer to Oleo in recipes is interesting.

While I’ve long been a staunch butter lover (I blame my mom)… I have been told, in certain instances… margarine is better.  Granted, it’s b/c it has more oil content and makes things unbelievable moist (along with clogging the arteries)… but still, worth considering…

-Eat Hearty

Arugula Crescent Roll Pinwheels

June 17, 2010

Skip to Pinwheel Recipe

Everybody needs that go to “crap-somebody’s-coming-over-with-friends-and-I-need-appetizers-STAT” recipe.

I have several of these – mostly b/c I somehow always end up entertaining — and they all revolve around canned crescent rolls and biscuits.  No one said I was a nutritionist.

I’ve cranked out these specific appetizers multiple times for friends and family.  The best thing about this pinwheel recipe is it’s versatility — you can literally put ANYTHING in these as a filling and they’ll taste (and look) amazing. The below is one of my favorites, but you should experiment and make your own mix… just be sure to include the cream cheese :-).


Ingredients:

  • One can of crescent rolls
  • 2-3 oz plain (or low fat) cream cheese at room temp
  • 3/4 cup arugula (finely chopped)
  • 1/2 cup Swiss cheese (grated)
  • Fresh ground black pepper (to taste)
  • Sea Salt (to taste)
  • 2 teaspoons rosemary

What you’ll need to clean up afterward:

  • Baking sheet
  • Cutting board
  • Knife

Step One: Preheat the over to the temp specified on the can of crescent rolls (usually around 450 degrees)

Step Two: On a clean surface, roll out the crescent roll dough in on piece.  You should be able to just unroll the dough, if the perforations are separating, squeeze them together.

Step Three: Evenly spread the cream cheese over the entire surface of the dough rectangle.

Step Four: Sprinkle the remaining ingredients over the top of the cream cheese.

Step Five: Beginning at one of the shorter ends of the rectangle, roll the dough into one log (should be about the same length as the dough was when originally after removed from packaging).

Step Six: Cut 1/2 inch medallions and place on a greased cookie sheet.

Step Seven: Bake for the minimum time on the roll packaging (usually 10-12 minutes) and check — pinwheels are golden when done.  Cool on wire rack for 3-5 minutes.

-Eat Hearty!

A taste of the Caribbean…vacay in St. Thomas

May 27, 2010

Let me just say… There’s nothing more relaxing than an island vacation. I’ve been knocking the “typical beach vacation” for YEARS.  Examples of things I might have said:

“Beach vacations just SOUND boring, who wants to lay around all day?”

“What’s there to SEE on an island?  Sand, water… maybe a snake?”

“I don’t like rum… “

I was so mistaken.

I’ll spare you all the rubbing it in about laying in the sun, snorkeling, sailboats, jet skiis, etc. (I guess I just did it… ).  But what I have to share with you over the next week (I just got back so it’ll take some time with the one billion work emails waiting for me) are a couple of the recipes I picked up on the island… watch out there’s some dangerous one’s in there 🙂

Bushwacker (the perfect beach drink)

Coral Reef Cooler

Jerk Chicken

Caribbean Stewed Chicken

-Eat Hearty!

BBQ Pressure

May 8, 2010

I’m heading off to a Pig Roast in Jersey City and I’m a little unsure if my contributions will be up to par.  Why is it the tiny phrase “bring a couple of your favorite snacks or side dishes” can cause so much Anxt.  I have literally been vacillating on this all week (enough to drive Keith up the wall).  I finally made some decisions.

Here’s what I’m bringing (recipes to follow tomorrow):

I should mention… they asked for finger/snack foods.  I have another BBQ next week with work people so I’d appreciate any additional BBQ suggestions you might throw my way.

-Eat Hearty

Fried Egg Salad

May 6, 2010

So around 11 last night I arrived home from my Cinco de Mayo celebrations.  Everyone will be shocked to learn, I had a couple margaritas. 

Starving to death, but not feeling like heading to the Amish Market I decided to make a (hopefully) low calorie* meal/snack… a “smeal” if you will.  In my fridge I found some asparagus, eggs, prociutto, and some swiss cheese.  Fortunately, I’m a big proponent of the breakfast for dinner concept… so I whipped up one of my go to “next day” recipes, the Eggs Benedict Salad.  Simple, quick and delicious (and also cheap). 

 *As I’m heading to St. Thomas in 2 weeks… I’ve got to keep the smeals margninally healthy.

Ingredients:

  • Arugula (1-2 cups… a nice bed)
  • Prociutto (can also used leftover ham or roasted chicken)
  • 1/4 cup shredded swiss cheese (smoked gouda would be GREAT also)
  • 1 teaspoon olive oil (for drizzling)
  • 1 teaspoon balsamic vinegar (for drizzling)
  • 2 eggs
  • 1 tablespoon butter (could also use Pam or a little more olive oil)

What you’ll have to clean up afterward:

  • Frying pan
  • cheese grater
  • serving bowl

Step One: Place arugula in bowl and drizzle with olive oil and balsamic vinegar.  Toss and season with fresh ground salt and pepper to taste.  Add 1/2 the cheese and the prociutto on top.

Step Two: Melt butter in frying pan on medium heat.  Crack egg into pan and fry the egg  to your preferred consistency (I like mine sunnyside up or over easy… you want some runny yolk).

Step Three: Place the two eggs on top of the salad and top with remaining cheese.  Pop the yolk and stir to mix all the warm gooey goodness.

-Eat Hearty!

Angie’s two cheese alfredo (with chicken and asparagus)

April 29, 2010

“If you want something to taste good, you have to use quality ingredients.” – (Grandma) Millie Cherryholmes (and virtually every chef/foodie/decent cook in the world)

This is never more true than when it comes to sauces… specifically an Alfredo sauce.  Personally, I’m not really a big fan of the cheese sauce + pasta combination — I much prefer a bolognese or simple Italian gravy — but as it’s Keith’s favorite… on occasion I cave.  In this instance, I’m glad I did.

I realize this is technically  probably not an Alfredo sauce… but let’s just be kind and say it is.  Normally with cheese sauces I stay very french and stick with Swiss and add a few spices.  Last night I needed something different (with allergies if the flavor doesn’t slap me in the face, I taste nothing… so clearly Swiss just wouldn’t cut it).

My new friend at the Amish Market on the corner (who we’ll call Angie) had a good 2 minute conversation with me in the cheese aisle about sauces – which is saying something of a total stranger in Manhattan – and agreed with me that if I was going to mix two flavors of soft cheese in a sauce, Swiss and Smoked Gouda would probably be a safe bet.  So here we go.

Ingredients: (serves 3-4)

  • 1 cup Swiss cheese (grated)
  • 1 cup Smoked Gouda (grated)
  • 2 chicken breasts
  • 1 lb Asparagus (chopped)
  • 3 tablespoons olive oil
  • 1/4 teaspoon rosemary
  • Garlic powder (to taste)
  • Sea Salt (to taste)
  • Black pepper (to taste)

What you’ll need to clean up:

  • 1 baking sheet
  • 1 cutting board
  • 1 cutting knife
  • 1 basting brush
  • 1 soup/stock pot
  • 1 sauce pan

Step One: Pre-heat oven to 350 degrees

Step Two: Fill a 3 quart (or more) soup or stock pot half full of water and bring to a boil, add salt and a dash of olive oil. Bring to a boil.

Step Three: While waiting for water to boil, brush both sides of chicken breasts with two (of the three) tablespoons of olive oil and sprinkle with rosemary, salt, pepper, and garlic powder.  Place on lightly greased baking sheet.  Toss chopped asparagus in remaining olive oil and place on same baking sheet.

Step Four: Roast chicken and asparagus in 350 degree oven for 20-22 minutes (until no pink is left in chicken).

Step Five: While chicken and asparagus are roasting, put pasta into boiling water until at desired consistency (8 minutes) and remove, drain and cover.

Step Six: While pasta is cooking, place sauce pot over medium heat and melt 2 tablespoons of butter.  Once butter is melted, add 1 tablespoon of flour and whisk until butter and flour clump together.  Add 1 cup of milk and bring to a simmer, stirring continuously until smooth.  Remove from heat and add both swiss and smoked gouda and sir with which until sauce is smooth (you can bring back over heat if cheese isn’t melting).

Step Seven: Pour 3/4 of sauce into prepared pasta and stir until fully mixed.

Step Eight: Remove baking sheet from oven and cut chicken breast (on cutting board) into strips.

Step Nine: Equally distribute pasta into bowls and top with chicken, roasted asparagus and a 1/4 of remaining sauce (if desired) for each portion.

-Eat Hearty!

Will Bailey’s Trump Red Velvet?

April 13, 2010

It would appear that the Red Velvet cupcake has trumped the Carrot Cake, and that’s what we ended up making in the Hamptons this weekend.  More on that later this evening.  What I have to mention now is a chocolate cupcake with Bailey’s and whiskey that I can’t wait to make this week.

Double the Sugar Blog did an amazing job with this, and I’m eager to see if it tastes as good as it looks… you have to read it to believe it.

-Eat Hearty

Red Velvet or Carrot Cake?

April 11, 2010

So I leave tomorrow for a work off-site retreat in the Hamptons (sounds fun right?) and we are cooking/baking for ourselves.  Naturally I’m THRILLED and excited to be planning a menu to cook in a “real house kitchen.”  The only question I have left is Dessert.

Cupcakes: RED VELVET or CARROT CAKE. What are your thoughts?


Monkey Bread…a moment of weakness

April 8, 2010

Generally speaking, my coworkers suffer on those days when I know an egg white sandwich or yogurt just isn’t going to cut it for breakfast.  On THOSE days, I decide to bake… and my co-marketing department members take on the role of “partners-in-crimes-against-the-waistline”.  It is what it is.

Today’s episode of Making the office plump is brought to you by my Mom’s RIDICULOUSLY SIMPLE monkey bread recipe.  When I make this — which is more often than I care to admit — I can literally whip it up in 40 minutes before work, start to finish.

Ingredients:

  • 2 cans of Biscuits (the cheap “four pack kind” works)
  • 1 stick of butter (I warned you)
  • 1/2 cup chopped walnuts
  • 1/4 cup brown sugar
  • 1 cup cinnamon sugar mix (cinnamon to your preference)

What will you have to clean afterward:

  • one bundt pan
  • one medium size mixing bowl

Preheat the oven to the heat specified on the biscuit tube

Step One: heavily grease your bundt pan with butter be sure to get all the crevices.

Step Two: Spread the walnuts evenly across the bottom of the bundt pan and sprinkle about half the brown sugar over the nuts (you love brown sugar — as  I do — you can use all and get a little more to layer in).

Step three: Using kitchen shears, cut the biscuits into uneven pieces (you should get 3-4 pieces per biscuit), roll them in cinnamon/sugar mixture and spread them evenly in the bundt pan (on top of nuts and brown sugar).  You can also layer in brown sugar to taste with the biscuits.

Step four: Melt the stick of butter and pour evenly over the biscuits (it will seep down and make it sticky and yummy).

Step Four: Put the pan in the over for 20-22 minutes.  Remove and let cool on a rack for 10 minutes before flipping onto a plate and serving.

This is really great to share as guests -or co-workers- can simply pick pieces off with a fork  (if we’re being polite) or their fingers (if we’re being realistic).

-Eat Hearty!

Stuffed Pork Tenderloin (less than 30 min)

April 7, 2010

One year ago if you had mentioned stuffing any type of meat and roasting it, I probably would have knocked you down heading for the nearest diner or bistro (depending on the status of my bank account).

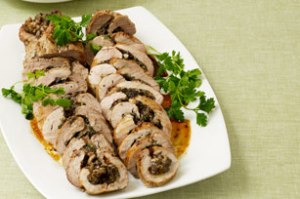
Stuffed-Pork-TenderloinHOWEVER, having now conquered my fear of stuffing meat (chicken, pork tenderloin… that’s really it for now), I’m totally obsessed.

In my opinion, a stuffed pork tenderloin is the easiest, tastiest, swankiest meal you might ever make in under 30 minutes.

Ingredients: (for two people)

  • 2-3 lbs Pork Tenderloin
  • 2 cups finely chopped spinach
  • 1/2 cup crumbled feta
  • 1/4 cup chopped sundried tomatoes
  • 4 cloves of garlic (minced)
  • 2 tablespoons of olive oil (divided)
  • Salt (to taste)
  • Pepper (to taste)
  • 1 teaspoon of rosemary
  • 1 teaspoon of thyme

What will you have to clean afterwards:

  • one oven safe pan
  • one medium size mixing bowl
  • one cutting board
  • your usual chopping knife

Preheat the oven to 375 degrees

Step One:  make your stuffing. Mix the chopped spinach, sundried tomato, feta, garlic, one tablespoon of olive oil, rosemary and thyme together in a mixing bowl.

Step Two: Prep the tenderloin.  Now we make the cavity for the filling.  This is the most seemingly daunting part…get that out of your head.  Cut the plastic wrapping off one end of the tenderloin (this makes the process much cleaner).  Hold the tenderloin vertically with the open end up and the still covered end on your prep surface.  Place your wooden spoon in the center of the open end and just start shoving it into the tenderloin — it sounds crazy, but it works.  The meat is so tender you will be able to work the spoon all the way through the length of the meat making one long whole through the entire tenderloin.

Step three: stuff the tenderloin. After your hole is made, simply stuff your filling into the tenderloin by using your wooden spoon handle as a ramrod and packing the filling all the way through the meat.  This is when the remaining plastic casing comes in handy, once the filling is all in, rub the meat with salt and pepper and a little bit of olive oil (you can also add Rosemary and Thyme to taste).

Step four: cook the tenderloin. Place your oven safe pan on the cook top on medium-high heat and add the remaining tablespoon of olive oil.  Sear the tenderloin 1-2 minutes on each side.

Move the pan into the oven and roast for 15-20 minutes.  Meat should still be juicy and thermometer should read around 140 degrees.

Step five: serve. Cut the tenderloins into medallions and serve with a spinach salad or roasted asparagus for a delightful (and fairly “guilt free”) meal.

Eat Hearty!